Thursday 31 August 2017

{ScrappingClearly} Beautiful ~ A Scrapbook Page

Hey again scrappy friends! I know it was only yesterday I shared but I am here with you again today to share my take on the August moodboard challenge!

If you have yet to see it here is a quick refresher!


And you do still have some time up your sleeves if you've been meaning to and simply haven't gotten to it yet!! Load up your entry here in the FB group!

Here is my take on the challenge and it is quiet simple for me but I really love the finished page! I have used the very spring like "Spring Fling" collection by Pebbles and can't wait to pull this out again and get creating again!


This is another page where I am scrapping a Honeymoon photo. We headed to Malaysia for our Honeymoon 10 years ago and spent some time in Langkawi and also KL. As tourists, of course, we had to visit the tourist places and one of our stops was the KL Butterfly Park and I did this page as a kind of "title" page for this part of our album.

I started with this paper for my background and love the neutral base colour it gives as a background!


I have used the gorgeous puffy stickers and some of the ephemera pieces from the Spring Fling collection by Pebbles for my simple clusters along with a label from my stash which I cut in half.


This gorgeous title piece is gold glitter by Heidi Swapp and the glitter doesn't come off - winning!!
The other alpha is from my stash.


Like I said, a pretty simple layout but I love it!

I hope I have given you some last minute inspiration to join in on the challenges for August and I'll see you again next month!

Happy scrapping!

Melinda

Wednesday 30 August 2017

{ScrappingClearly} Wander and Take It In ~ A Scrapbook page

Hello scrappy friends!! I'm here with you today sharing my latest DT make for ScrappingClearly!

For today's post I was really inspired by this months sketch challenge, once again created by the very talented Peg! If you have yet to see it here it is


And here is my creation


I have used the very fun Citrus Bliss collection available ON SALE in store now and I will provide links at the end of my post!

I really stuck to the sketch as much as possible for this one - I really loved all those layers behind and next to the photo's.


It took me a while to find the "right" photos for this page but after a bit of digging I found these 2 from our Honeymoon back in 2008 - a good size and the "right" orientation for the sketch!


I was busting to get these Thickers out and used so after some struggle getting the wording correct for the story I wanted to tell I got the Wander and the Take It In phrase on the page!

Paired, of course with some gorgeous Colour Blast Sienna in both the Colour Paste and Colour Shimmer Spray.


If you would like to see my whole process just click on the play button below and you can watch my process video - and make sure you hit the subscribe button so you never miss any shares on the channel!


I hope I have given you some last minute inspiration to play along with the sketch this month, make sure if you do you add it to the correct album over on the ScrappingClearly FB group to be in the draw to win a voucher to the ScrappingClearly store!!

That's it for me for today, thanks so much for stopping by!

Until next time, happy scrapping!


Melinda

Products Used:

Pink Paislee - Citrus Bliss - 12x12 Paper - Seeds
Pink Paislee - Citrus Bliss - 12x12 Paper - Squeeze
Pink Paiselee - Citrus Bliss - Instagram Cards
American Crafts - Go Now Go - Copper Thickers
Studio Calico - Lemon Lush - Chipboard Hearts
Colour Blast Colour Shimmer Spray
Colour Blast Colour Paste

Saturday 26 August 2017

{Colour Blast} Flying Baby ~ A Scrapbook Page

Hey my scrappy friends, today I am here sharing my latest DT make for Colour Blast Australia.

I decided to play along with the August challenge this month and instead of using just one product I have used 2 but in a RAINBOW of colours!!

Here again is the August challenge for you


I have used the Colour Spray and a Colour Paste.

Here is the line up of my sprays


Like I said, a RAINBOW! In it's true ROYGBIV form! Yep, I'm using Indigo and Violet but from left to right the colours are:
Love, Sunset, Saffron, Rainforest, Lagoon, Indigo and Violet. 

And just a refresher if you are  not sure, the Colour Sprays are beautifully pigmented flat colour with no shimmer but gorgeous none the less!!

Here is what I did with my Colour Sprays


This is a technique I have been meaning to use for ages but just kept forgetting! I have simply sprayed each colour 2 or 3 times straight onto the bubble wrap - which I cut to roughly 12x12 size - and then put my textured card stock on top and did some reverse stamping! No gesso needed as there was  not a lot of water being added to the page.


This is what my stamping looked like!! I just love it! And so too does my 7 year old who chose the photo's I am scrapping today ;) Needless to say, they HAD to be of him!!

I left that to dry naturally and added a couple of layers of white tissue paper behind my photo. By the time I got that stuck my background was dry and ready for me to do my next layer, which was some stamping in both a light and dark grey ink.


I did a real quick dry off with my heat tool and added another layer. This time I wanted sparkle and not much colour so I grabbed the beautiful Snow White Colour Paste and this fun 7 Dots stencil.


As you can see in the photo the paste goes on white with some shimmer but as it dries it goes clear with SO MUCH shimmer. It is beautiful and I love that you can still see the stamping and the rainbow through the paste.

Time for some coordinating embellishments. 


I chose wood veneer from Cocoa Vanilla Studios and 3 of the Colour Sprays - Love, Lagoon and Indigo and just painted the colour straight onto the veneer. I hurried along the drying process with my heat tool and then my next step was, of course, more shimmery goodness!!


I used my embossing ink dabber and of course the Snow White Colour Embossing Powder. 2 coats just to make sure they were super shimmery ;)

With all of my bits coloured and dried it was time to assemble my page and here is the final design


I felt that the white edge left a little something to be desired so I found this fun rainbow patterned paper in my stash, gutted it, cut down my white and attached my page. I think it really makes the whole page come together - especially with that rainbow stitched border!

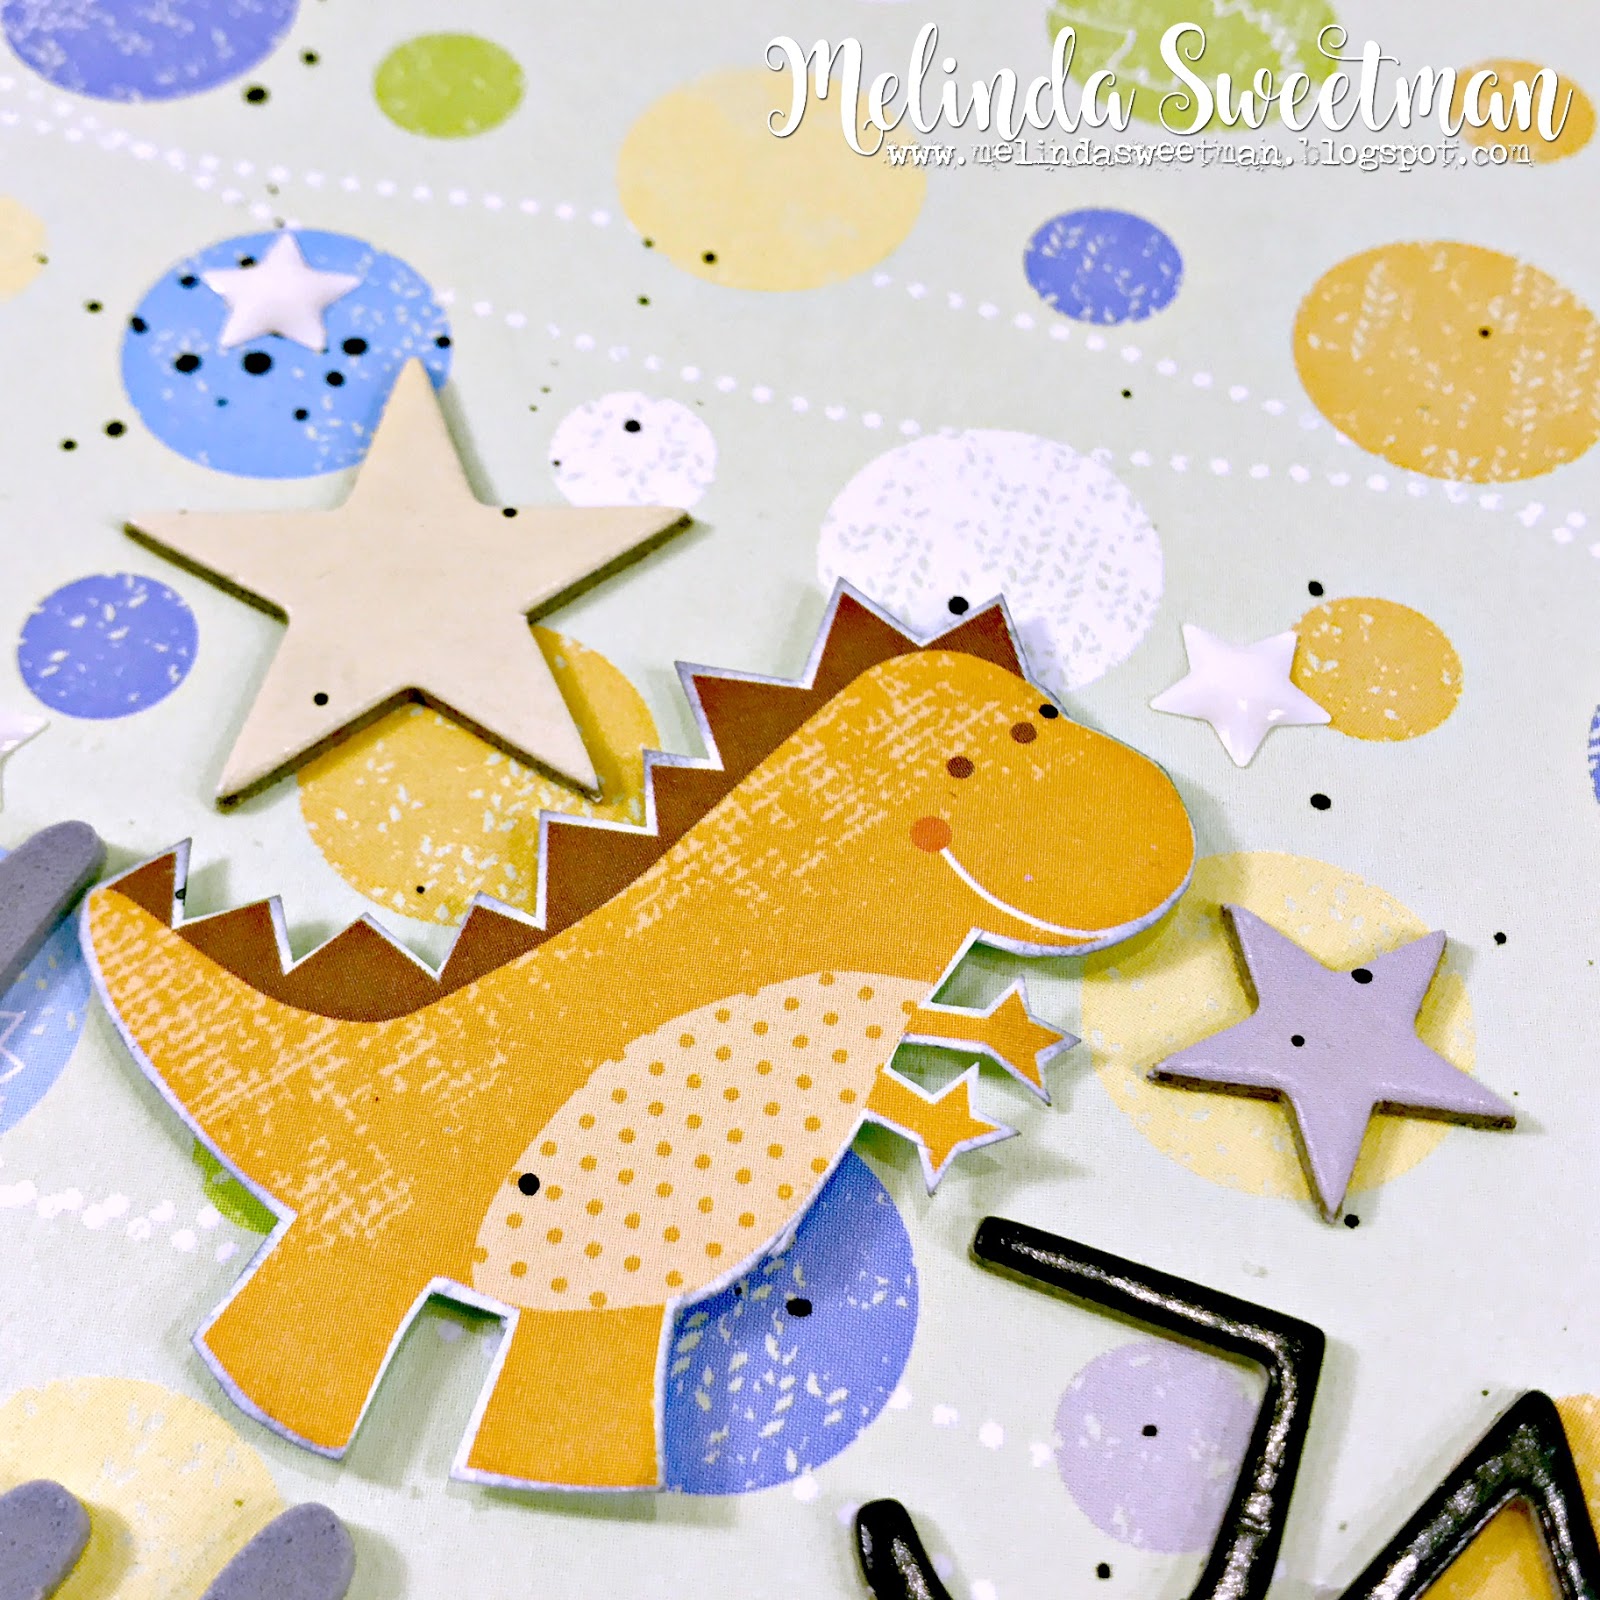
Here are a few more close ups! Well, quiet a few close ups actually! Enjoy!


Here you can see all that beautiful shimmer from the Colour Paste!


I tried to keep the embellishments within the background colours and love how the veneer came out!


So, that is my challenge for August done and I love the end result using a technique I have wanted to try for AGES!

There is a process video available, just click the play button below!


You can load up your take on the challenge here in the FB group and I hope I have inspired you to play along for the chance of a Colour Blast voucher!

Until next time, happy scrapping!


Melinda


Saturday 12 August 2017

{Colour Blast} Diamond - An Art Journal Page

Hello Colour Blasters, it's Melinda here with you today and I am super excited to share with my latest make using the A-MAZING Colour Blast goodies!!

Today I have an art journal page for you all, I just wanted to play a little so started by finding a quote. This was super simple, I jumped on my computer, went to google and simply searched "quote" - I know, right?! So this quote jumped out at me pretty quickly and I ran with it!


I love, love, love the quote and I love, love, love pink diamonds ;) But this quote just spoke to me in it's entirety so now I not only had a quote but a colour scheme as well so off I went and grabbed some yummy goodies and my art journal and got started!

First up a quick, messy, texture-y coat of White Heavy Gesso using a wide paint brush. I wanted the texture of the bristles so I wasn't too careful about making it neat and flat! I forgot to take a photo of that step, oopsies, but you can see the texture as the page comes together!

Next up I grabbed my Lollipop Colour Shimmer Dust and a tiny paint brush. I flicked some of the dust around the page, squirted it with a little water and then moved my page around to get the colour moving. You can see in this photo the texture of the gesso and also some product from another project where I had applied my left over product.


Oh, I so love this colour!

Next up I pulled some black, white, pink and gold washi from my stash and added random strips in a cross on my page.


Next I applied a quick coat of matte medium from my stash to seal those layers but then decided I wanted to tone down some of the colour and pattern so grabbed my white gesso again and using my finger smudged it all over the washi and some of the shimmer dust.


Next up a little stamping using a sketchy diamond stamp and a text stamp and some Staz-On ink.


I dried that off with my heat tool and grabbed my Dusty Charcoal Colour Shimmer Cube which I had activated with some water and a paintbrush and again, just added colour straight over the top of what I had already added knowing that it wasn't going to mix as I had applied both the matte medium and the gesso.


Again, I decided that there was too much colour so when this was dried off I grabbed a baby wipe and smudged some of the colour around and took some off the page. I dried that off with my heat tool and while I had the Colour Shimmer Cube out I added some splatters with my paint brush.


Time for my quote!

I cut some diamond shapes on my Cameo and also the word "diamond", I left the cut pieces on the mat and coloured straight on top of that so it was easier to keep all the bits and pieces together.

I have used my Colour Shimmer Cubes in Bling, Punch and Blush. First up some black stamping on the word using the same text stamp, then a thick-ish coat of Bling. Then I grabbed a couple of paint brushes and randomly added colour to all of my diamond shapes. When that was all dried off I added some splatters of the pinks and bling on the diamonds and only the bling on the word. I LOVE how these look!


While that dried I added a little more texture to my page using a text stencil and some Bling Colour Paste, again in that kind of cross shape down and across the page. I left that to dry naturally as I didn't want the paste to bubble as it dried.


Time to assemble! I added in some cheese cloth behind my "diamond" word, added some tiny alpha stickers and built my quote. I only ended up using 2 of the diamonds I created - one of the little ones and a medium but love how it looks!


My very final touch was a few splatters of Bling Colour Shimmer Cube and Roadbase Colour Spray! And my page was done!


It was so fun just playing and adding colour and not really having an idea of what or where I was going when I started!

Here are a couple more close ups of some of some of the details


Oh, how I love that Bling Colour Paste, it dries so gloriously gold and shimmery and just beautiful!!

If you haven't done it for a while grab some random products and have a play! And why not participate in the brand new challenges we have starting this month! 

This month's is a fun and easy one


I'll be sharing my take on the challenge later in the month ;) For now here is the link to the FB group if you are not already a member so you can load up your take on the challenge!

Here is the process video if you'd like to see this art journal page come together


Thanks for stopping by and happy creating!!

Melinda
xx


Tuesday 8 August 2017

{Stash} Baby-o-saurus ~ A Scrapbook Page

Hi there my scrappy friends!!

Today I am here with a stash share!! Yay, I really, really love diving into my stash and using some of the things I may or may not have been hoarding for years ;)

My share today is using one of my all time fave collecitons - Baby-saurus by Little Yellow Bicycle. This range is quiet an old one, I believe it's dated 2011 and I have used it to create my biggest boys 1st year album and am using the very last skerrics of what I have left which is not much!

Here is the page I created, again inspired by the amazing Shimelle Laine!


I have pulled out a couple of sticker sheets, some thickers and a couple of chippy stickers sheets and added what I loved without adding too much. That background is quiet busy with all of those circle but I just LOVE how this page turned out!

There is a process video available, just click play below ;)


Here are a few close ups!


I hope you enjoyed my share today, I really do love re-discovering my stash and I really love scrapping some of these older photo, I mean look at that adorable chubby face!!
Until next time, happy scrapping!

Mel
xx

Tuesday 1 August 2017

{K+ August Guest} My Darling Big Boy ~ A scrapbook page

Hey, hey scrappy friends! I have a relatively quick share for you today but I LOVE, LOVE, LOVE my end result and am super duper excited to share!

So, of late I have been playing along with the very awesome and fun challenges over at Kraft Plus Challenges and I was lucky enough to be asked by Sandra to be their guest designer for August!! I gotta tell you, when the message came through I literally squealed!!

So, if you have yet to see this month's challenge it is "be inspired by trees" and I will be honest and tell you that I struggled with this for a couple of weeks before my idea came to fruition! 


First I thought "christmas trees" and then I was thinking tree colours and then I was stuck again. So, google to the rescue! I simply searched "tree quotes" and found this one


Inspiration struck and off I went! I used my cameo to draw out a tree shape BIG on my background and then used my amazing Colour Blast Colour Shimmer Cubes to colour it up! 


I won't get into too much detail but we are having a few issues with my biggest littlest man so right now we are on a very emotional ride and doing the best we can (as all Mums and Dads do!!) and this was therapy for me. And a big long letter to my biggest boy on the back of the page, just for him, from me. Here are a few close up details.


I have incorporated the advice from a tree tucked into a bag behind the photo and something I hope he takes with him throughout his life, I believe some very worthwhile lessons/advice ;)


A few florals, I mean we are talking trees and leaves and he CHOSE to have his face painted as a rainbow butterfly, some splatters, sequins and hand stitching to finish it off!

I did record my process so if you'd like to see this page come together please just click below and watch away!


Sandra and all the K+ team, I so love your challenges every single month, with this month being no exception, so a massive thank you for inviting me along to be a guest this month! It was a true pleasure and honour!

So, that's it for me for today, I have some other projects coming up this week so until then, happy scrapping!!

Mel

xx